Tuesday, January 31, 2017

Stripes or no stripes on my Cobra?

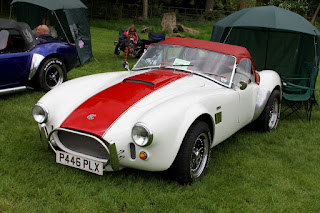
Ummmm. What colour stripes should I choose if any? The car is currently plain white, but originally (nearly 2 years ago) I had planned to add black and red stripes. The interior is mainly black, but has red stitching on the leather and some of the carpet is red.

Should I have stripes? One or two main stripes? Pin stripes down the sides? What colour(s)? The choice is too much!

I want to keep the main white of the car, so will not be painting it. What do you think I should do?
My Cobra now
Original idea
Some other versions to get you thinking (there are plenty of variations too):
And finally the car that inspired me to build a Cobra
Please let me know what you think. You can let me know by clicking on the pencil, then writing your thoughts. Thanks.

Polishing and passing time!

I finished off polishing the Cobra today. At first by hand, then by machine using a lambs wool bonnet. Looks good, a real shine to it.

I have asked Andy at GD to install a new brake pipe to replace the damaged one, when the car goes to him for checking over and the IVA test.

Now it is a case of twiddling my thumbs until the car is collected for the IVA. What will I do with all my time - no car, no blog ........ I am sure that my wife has plenty of ideas!

Saturday, January 28, 2017

Bleeding brakes!

Brakes

There was a weep where the copper pipe/brass union joined the central (rear brakes) master cylinder. There may not have been much of a weep, but with brakes you don't mess around. To inspect this I had to drain the brake fluid from the reservoir and pipes above the rear master cylinder - messy! Here I attached a plastic tube to the nipples of both rear callipers (separately). I then opened each nipple to drain the fluid from the pipes, as if bleeding the brakes, and the reservoir. The Eezibleed system was used to put some pressure in to the reservoir and pipes to flush out the brake fluid.

Once this was done, the rubber pipe that feeds the reservoir and the copper brake pipe were removed and inspected. I could see a small score on the copper brake pipe flare. Then I noticed two cracks in the brass union. No wonder it was leaking! I had probably tightened it too much to cure the weep from the flare in the copper pipe. Unfortunately I don't have a spare union or section of brake pipe to make another. I cleaned the master cylinder union hole with a cotton wool bud dipped in acetone, to get rid of any oil, then conceded defeat.

So I need to speak to Andy on Monday morning and ask him to fit a new union and pipe when the car comes down for checking over. As a result the handbrake cannot be finalised, so another job for Andy.

Polishing

Because I couldn't do any more work on the brakes, I turned my attention to cleaning the car. After vacuuming it out, I used Simonize carnauba wax on the body. Not the easiest stuff to put on and take off, but a great shine. Managed half the car before I got bored. Will do the rest tomorrow.

Friday, January 27, 2017

Final checks

Electric test

I was happy that all the electrics were working now, but a check prior to the IVA would not go astray. The electrics were tested with the engine off (ignition on) and with the engine running. So here is my checklist:

  1. Side lights - ok
  2. Dip lights - ok
  3. Main beam - ok
  4. Main beam warning light - ok
  5. Flash lights - ok
  6. Gauge back lights when lights on - ok
  7. Fog light - only when on dip or main beam - ok
  8. Fog warning light (only works on main lights, not side lights) - ok
  9. Heater speed 1 - ok
  10. Heater speed 2 - ok
  11. Reversing light - ok
  12. Indicator off side - front, side, rear and warning light - ok
  13. Indicator near side - front, side, rear and warning light - ok
  14. Hazard lights - all indicator lights flash - ok
  15. Hazard warning - mine does switch, left and right indicator warning lights - ok
  16. Horn - ok (loud)
  17. Ignition light - goes out when engine running - ok
  18. Wiper - intermittent (if fitted) - ok
  19. Wiper - speed 1 - ok
  20. Wiper - speed 2 - ok
  21. Washer - ok
  22. Brake fluid warning - from drivers seat (via ignition) and push on top of reservoir - ok
  23. Brake lights - ok
Ride height

The ride height was adjusted so that the bottom of the front indicators were a minimum of 350 mm from the floor. The adjustment was made by turning the spring collar clockwise on the shock absorbers. A 'C' spanner was used for this. Mine took 10 turns to get the ride height correct. To keep count of complete turns put a small piece of masking tape on the platform and one on the moving collar, then mark a line across both pieces (see photo below). My chassis was a Euro, so the ride height was initially set by GD.
Markers on all four shockers
Pre IVA

Here is a pre-IVA check list for the GD 427. The results are shown in italics. Some final tweaks will be done by GD prior to the test.

  1. Fit IVA fog light - needs to work only when main lights on (not side lights) - GD
  2. Check number plate light bolt radius - Done
  3. Change boot handle for IVA compliant (radiused) version - GD
  4. Number plate bar and dummy in place - Done
  5. Put rubber caps on door handles and starter button if necessary - GD
  6. Add anti-slip covers on pedals if not GD drilled pedals - n/a
  7. Add aluminium covers on screen pillar legs and wiper motor edge (if necessary) - GD
  8. Make sure speedo is on driver's side - Done
  9. Check all switches and warning lights are labelled - GD
  10. Check relay block is high on scuttle side, not in foot well - Done
  11. DOT4 brake fluid warning sticker on reservoir - GD
  12. Check that nuts on steering column are nylocs - Done
  13. Front wheels clearing inner arches on lock - Done
  14. Front and rear wheels and tyres in straight ahead position must be within a plumb line of the wheel arches when measured between points that must not extend at least 30 deg. of the wheel centre for the leading edge and 50 deg. for the trailing edge - Done
  15. P-clips securing boot loom (not tape) - Done
  16. All wiring and plumbing secured at regular intervals - Done
  17. Raise ride height so that bottom screw on front indicator is at least 350 mm (my screws were horizontal so I measured to the bottom of the indicator) from the ground and rear suspension is corrected too
  18. Check that stone guards are edged in rubber or flush - Done
  19. Replace side vents with blanks or fit rubber edging - Done
  20. Screen pillar and centre mirrors fitted to GD advised position - Done
  21. Remove any soft top fixings from screen pillars - n/a
  22. Remove windwings and sunvisors - n/a
  23. Screen washer filled and working - Done
  24. Instrument radius to check - if 1/2- V type needs to be recessed - Done
  25. Check that nylocs are used on seat fixings and seat belt anchorages (alternatively use spring washers) - Done
  26. Seat runner adjustment levers removed and seats set in rear most position (if using roll bar head restraints) - n/a
  27. Fit headrest in fills - n/a
  28. Fit rubber edging to seat belt hooks and headrest T's - GD
  29. Check hand brake lever for adjustment - GD
  30. Check rubber boots are on alternator and +ve battery leads - Done
  31. VIN plate fitted with chassis and engine number - Done
  32. Change steering wheel to IVA compliant if required - GD
So now it is just the brakes to sort out, then a wash and clean prior to the IVA.

Sunday, January 22, 2017

First engine start!

I had taken my time getting here I was told.

On the big day I had two helpers/observers in Keith Akerman (built a GD 427) and Steve Hughes (building a GD 427). Steve was the camera and sound man. Keith the eyes on the engine bay etc. I must admit that I was nervous and excited. Anyone who says they are not nervous is fibbing!

Before I turned the Chevy LS6 engine over, we checked the Schrader valve on the fuel rail. It still leaked. Not the start to the day I had wanted. After a quick trip to Halfords we returned with a valve tool and a new valve (I will change this for a genuine part as soon as it arrives from the States). Changing the valve was a quick job and it worked, no more fuel leaks!

Next we checked the dip stick to make sure that the oil level was were it should be. When I turned over the engine a few days ago without the plugs in I had over 30 lbs of oil pressure, so that was ok. We checked the coolant and all connections. The cap from the coolant header tank was left loose at first in case there was any trapped air. I had plenty of trapped air too!

The car was pushed out of the garage on to the drive to avoid any fumes or blackening my new cabinets. Car chocked in place, fire extinguisher ready and bonnet up .......... Ignition switched on. There was the sound from the fuel pump and an ignition light. Good start. Now just press the start button. Go on then, do it!

8 seconds or so turning over and she fired and ran. Grin from ear to ear! Thanks Kyle (engine builder). Here is a video of the big start up taken and edited by Steve. Look out for the child in me! TIP: Use a PC to view this video as it needs a Flash player.


At first there was some smoke and some steam - no worries as I had spilt some brake fluid and coolant earlier so could explain this. Whilst it was running we checked that all header pipes were going a nice bronze colour to indicate that there was a spark/heat coming from all 8 cylinders. No leaks!

Next we checked that the fan was coming on and sucking in to the radiator, rather than blowing forward. Of course it was going the wrong way. Then we checked the gauges (fuel, volts, oil pressure, oil temp and water temp) - all okay there. Oil pressure up at 60 lb or more. Alternator belting out power. Fan cut in at around 80 deg. Still no leaks!

After turning off the engine, I swapped the wires to the fan around to suck, rather than blow. We also noted that the fuse to the fan had just blown, as the rating was too low at 20 amps - Keith saw the fan twitch just as the fuse blew. This was changed to a 30 amp fuse.

We then started it up again and again (yes we all tried it). In amongst the activity, Keith squeezed the coolant pipes to move any trapped air. There was heat in the heater flow and return pipes. All looked okay and it sounded good too. Neighbours came out to see what all the noise was. The Mrs thought it was a plane, but it went on too long. Great feeling!

So another milestone completed in my GD build. Again thanks to Keith and Steve for all their help and encouragement.

Wednesday, January 18, 2017

Dashboard and steering column shroud in place

Took off the steering column shroud today, after yesterday's work.

The electrical connections around the column were interfering with the shroud, so I gently bent a couple of connectors on the switch and some of the wires. I removed the insulation from the main ignition connector. Once the connector was exposed, I crimped this on to the cable and insulated it with tape.

Getting the shroud and stainless steel cover in place was interesting/frustrating. It is a friction fit around the column and in to the cover. It was hard to locate it properly without crumpling the leather at the edges. After a bit of squeezing, pushing and pulling, it went in to place and could be fixed with button head bolts to the plastic mounting. The leather is persuaded to go through the dashboard hole, but is not glued in place. Watch where the cables go, as it is easy to trap them or route them incorrectly. It is also easy to pull off connectors when doing this!

Next I fitted the under dash trays. again I had to watch that I didn't trap any cables. The trays are located between the lower part of the dash and a cross member. The end nearest the bulkhead is fixed with self tapping screws.

So this is the finished job .... or so I thought.
Dashboard in place
I then tested the electrics again and I have clearly disturbed some wires in the process. It appears to be an earth issue, so Paul will be called in to sort out my clumsy work!

Tuesday, January 17, 2017

Preparation for engine switch on

Oil and plugs

I drained some oil as recommended by the engine builder. So jack up the car again to get access.
Oil drain plug to right of centre
It is now at the top of the range shown on the dipstick.

The plugs were really difficult to get back in as there is very little room, so not looking forward to servicing the engine!

ECU

This was connected using the big multi-plug on the loom. It fits with one end in the slot first, before pushing the multi-plug flat against the ECU. Finally it is locked in place with the handle on the multi-plug.
ECU connector on loom
Now all sorts of things work, including the fuel pump.

Fuel

I turned on the ignition and heard the fuel pump run. Next I purged the near side fuel rail via the valve at the front.
Valve at end of fuel rail
This did not re-seal itself as expected. This may be some swarf from the fuel pipe. Apparently I should have purged from the fuel pipe, not the fuel rail.  So note this mistake. The fuel pipe flexible hose needs to be disconnected before fuel is pumped to the engine. Catch the fuel in a container and dispose of it.

Next I noticed another leak from one of the fuel hoses at the rear from the fuel pump. So I jacked up the back of the car this time to gain access. It was easy to see which hose it was and to tighten the union.

Dashboard

Whilst attempting to fit the dash and the column shroud, I removed the ignition barrel again, but couldn't get it back in and the ignition switch connections were tight against the shroud. When squeezed the ignition turned on!
Dashboard in but column shroud not right
So with the fuel rail and the ignition switch issues, sadly I have abandoned the plan to start the engine tomorrow.

Monday, January 16, 2017

Better day today

Electrical

Had Paul Brown look at the wiring today. He sorted out the remaining electrical issues. Most issues seemed to be bad earths.

So the following are now sorted:
  • Indicators
  • Headlight flasher
  • All gauge back lights
  • Courtesy lights (they had no live supply)
  • Starter motor
All appears to be working well now, including the other items. Relief!

Oil

So it turns over now and there does appear to be a little too much oil in the engine. Will let it settle overnight, then dip it again. If it is still too full, I will let a drop out, then check for adequate oil pressure.

Sorry, no photos today.

Tomorrow's jobs

I need to check the oil level, connect the ECU and re-fit the plugs. Tidy up the wiring with tie wraps, then fit the dash, under trays and steering wheel. Once that is done, I think it is ready to fire up, with a bit of luck!

Sunday, January 15, 2017

Not a good day in the garage today

Coolant

No visible signs of leaks. Good news.

Engine

No visible oil leaks either. So I removed the plugs ready to turn the engine over and get oil pressure. The 8 plugs are really difficult to get at and were not easy to remove.

And it went downhill from here.

Tried to turn over the engine - switched on the ignition and hit the starter button. Nothing! I then connected the fuel pump wire to the battery in case there was any electrical connection here. Still nothing. Will sleep on that.

Fuel

Put some unleaded in the tank and no leaks. Good start. But no fuel pump sound. Urghhhh.

Brakes

Jacked up the car. Connected the Eezibleed system to the reservoir and a  tyre (gets pressure from here which allows you to do it on your own). The new cap leaked - easy enough to solve, I thought. So I rescued the old one from the bin! Bin diving is not a lot of fun. Fitted the old cap and great no leaks from the reservoir, but ........

Bled the rear brakes whilst keeping an eye on the brake fluid container and the reservoir. Then I noticed a great big puddle of brake fluid at the front! It was coming from a master cylinder where it joined the brake pipe. At first it was just dripping in to the off-side compartment, but then it started running out through some holes and on to the garage floor, which is when I noticed it.

Cleaned up. Packed up. Fed up!


Saturday, January 14, 2017

Preparing for start up

Preparing the engine

The engine has not been run since it was collected - almost 18 months ago. So before I attempt to start it, it needed some lubrication.

I had spoken to Andy at GD and to the engine builder. As the engine had run on the dyno it wasn't a first start, so oil would still be present in the pump. The advice from the engine builder was to remove the rocker covers, then add a litre of oil to each side. The oil was poured over the rockers/lifters, springs and down the pushrod bores. The latter required a "pump action" oil can to squirt the oil in to the pushrod bores, which are above the rocker assembly. Once this was done the rocker covers etc were re-fixed to each side and the engine left overnight so that the oil drained down and lubricated the top end of the engine.

Tomorrow, after checking for leaks, I will add the rest of the oil to the engine. Then I will remove the plugs, disconnect the ECU and turn it over until I have oil pressure. Lots of max 20 second bursts is best for the starter I have been told.

Wipers

Today I bent the wiper arms to line up the blades with the lower edge of the screen. I bent them in a vice with jaw protectors. The bending was trial and error until they lined up right. Once they were positioned correctly, I extended the arms so that the sweep was 380 mm. This is done by sliding the arms out a little away from the pivot point. When I was happy that the length was okay, I locked the arms in place by moving the little locking plate (near to the pivot point) to be parallel to the main arm.
Wipers lined up with bottom of windscreen
Seat belt anchorages

There was a locating hole in one corner of each anchorage. A small hole was drilled in the centre of each anchorage locating hole and a self tapping screw inserted to stop the captive bolt moving. I made sure that the eye bolt was mounted with the hole pointing towards the sides of the car, so that the eye was in line with the seat belt tension.
Seat belt anchorage located by self tapper
Hopefully this will satisfy Mr IVA.

A couple of outstanding points have been sent the Andy, but no response as yet.

Friday, January 13, 2017

IVA application

IVA test

I was contacted by DVSA yesterday to say that some of my photos looked to have been taken in a warehouse or factory, so would I confirm that only me or friends had built the car and that this 'lack' of information would delay my application. The photos in question were of me collecting the body in a van and the chassis being strapped on to a trailer outside Gardner Douglas. In addition I had already sent a signed declaration that I had built the car myself as an amateur builder. This blog also confirms that.

In my response to DVSA, I bit my lip and did not put what I really thought of them!

This morning I had another two emails. I tentatively opened them, expecting even more daft questions. But no, one was confirmation of payment of the fee (£450). The second said that the application had been assessed and had now been passed to the test centre to book the test appointment.

Another step in the IVA minefield.

Leaks

The leaks from the clutch reservoir and coolant from the thermostat housing appear to have been cured. Also no leak from the clutch master cylinder in the compartment behind the wheel. Yippee!

Thursday, January 12, 2017

Small things

It has been snowing on and off today and is very cold in the garage, so time in there was kept to a minimum!

Speedometer

After using the wrong diff ratio the first time, I recalculated the speedo setting with the correct ratio at 27,868 for the ETB gauge. This will need putting in to the speedo prior to using the car.

Front dummy number plate

After spraying the dummy number plate satin black, I fitted it to the car using 19mm P-clips and button head bolts.
Dummy number plate can be seen here
Clutch reservoir

I noticed a fluid weep from the reservoir, so had to remove it and refit. Looks like it is cured.

Coolant

Following my abortive attempt at filling the cooling system, I had to drain the fluid because of a leak at the thermostat housing.
Leak under thermostat housing on right of photo
I rescued the fluid, so that I could re-use it! The thermostat housing leak was sealed with Hylomar sealant and then refitted to the engine and the hoses. Care was needed not to trap the thermostat between the housing and the outlet, otherwise it couldn't be sealed (as I found out!).
Reseated and sealed

Tuesday, January 10, 2017

Coolant, clutch, IVA, ECU etc

Coolant

The coolant system took around 16 ltrs, 70% water to 30% antifreeze. This was added to the stainless steel expansion tank at the front of the engine compartment.
Coolant header tank
It was poured in gradually to reduce the risk of air locks. All pipes were checked for leaks at this stage. There was a leak in the thermostat housing - mutter, mutter. As this had a rubber O-ring I had not used any sealant. I should have - another lesson! So that's a drain down tomorrow. Not difficult, but a job I could do without.

If you are doing yours, remember that I have a Chevy LS6 engine. The amounts may differ on other engine types.

Clutch fluid

The reservoir was filled with DOT4 fluid. An auto bleed system was used, so that I could do it on my own. Air pressure from one of the tyres was used.
Clutch reservoir. Bleed nipple is on right of two pipes - not easy to get at
Oh, and I noticed that a wire had broken to the knock sensor, so I had to repair this.

ECU

The ECU was fitted to the centre under dash tray using button head bolts in to rivnuts. I made sure that there would be clearance for the gauges and that the connector would fit the ECU in that position.
ECU bolted to centre tray
The remote button for the speedo was fitted to the central tray too. It is concealed, but can be operated from the driver's seat. There is a gap between the underside of the tray and the transmission tunnel top.

NOTE: Fit a PC flylead to the ECU to make access to the ECU easier. See IVA and Post IVA category in the Build Process.

Tachometer

The dip switches on the back were checked to make sure that the settings were correct. For the ETB tacho the first 3 switches are set to 1 (on) and the remainder are set to 0 (off) for the LSV8.

The speedo will need setting too, but for the first calculation I had used the 3.23 diff and the later chassis (including mine) have a 3.07 diff. So I need to re-check the setting with ETB.

The faulty switch for the rear fog light was replaced whilst I played with the dashboard.

Starter heat shield

I had left this off for some reason. So it was added. Needed to remove the dip stick first.

IVA items

A dummy number plate is needed for the IVA and was made from MDF, sprayed black and fixed to the bar at the front in the nose using two 19mm P-clips.

The rear number plate lamp had the bolt changed for a button head to comply with the 5mm radius rule.
Hexagonal bolt swapped for button head

Sunday, January 08, 2017

Dashboard and electrical - testing

I put the ignition barrel back in. Click the U clip down using a thin screw driver.
Push this clip DOWN until it clicks
If the key is in the same position as it was when it came out it should click back in place. If it does not go in it could either be that the U shaped clip has not been pushed down fully or the key has moved a little in the barrel. The first issue needs the U clip pushing down until it clicks (Tip: use your phone camera to see this). If the clip is fully down then it could be that the key has moved. The key can be moved carefully anti clockwise (when viewed from the back) to the stop or clockwise, but whatever you do don't let the pin go as far as the hole at the end (look at the side opposite the key to see this)! The barrel should go fully home and click in to place.

At this stage the fuel pump was not connected to avoid any risk of starting up the engine by mistake. Not all the electrics can be tested yet e.g. engine related items cannot.

The results of the first test were:

Working okay

Heater blower - off, speed 1, speed 2

Hazard warning lights - all four indicators flash (should lights on wings flash too?)

Hazard warning dash light

Indicator warning lights - when hazards flash

Brake lights

Horn - initially sucked instead of blowing and produced a weasy noise. Swapped the wires around and oh boy what a noise!

Wipers - parking correct way, intermittent, speed 1, speed 2

Washers - water jet plus single wipe and park. Adjusted the aim of the jets

Rear reversing light - ignition key needs to be in fully turned position and reverse gear selected

Rear fog light - main lights need to be on - faulty switch, so this needs replacing (worked if jiggled), also I had connected the red/yellow wire by mistake (this is the reversing light wire)

Fog warning light on dash - but see above

Lights - side lights, dip, main beam

Number plate light - on with lights

Auxiliary output - on with ignition switch

Instruments (just the back lighting) - oil pressure, water temp, speedometer

Battery light - no alternator working

Brake fluid low warning - no fluid in reservoir

Not working

Instruments (just the back lighting) - fuel, voltmeter, tachometer

Lights - flash and door courtesy lights

Indicators - front, rear, side repeaters - off side front and rear work when the ignition is on, no matter what position the indicator stalk is in!

Checked the connections to the left column switch (indicators) and they are correct. Traced the wiring for the indicators in the loom and that looks okay too. The wiring to the instruments looks correct as well. So I am flummoxed.

Mark Turnbull suggested that I test the switch as this seems to be a likely cause. If this doesn't work, then it is time to call in the experts!

NOTE: The earth connections to the instruments etc have been the main problem, so pay particular attention to these.

Saturday, January 07, 2017

IVA application

Spent the afternoon completing the IVA (Individual Vehicle Approval) documents - amateur build declaration, application form, copy of major item invoices (chassis, body, engine, gearbox, instruments, tyres) and photos proving that I built it!

Submitted it on-line, attaching the forms and proofs.

So I am committed now to get it ready for the test by Valentine's Day. Fingers etc. crossed.

The car will go to GD for a once over, before being presented for the test in Nottingham. Paul Bowden will collect the car and transport to and from GD - saves me hiring a trailer, petrol and wear 'n tear.

Friday, January 06, 2017

Electrical connections

Loom changes

Horn

These should ideally have been made before the loom was put in to the body, as it would have been much easier. On the column wiper and horn switch, there are a couple of changes to make.
First the horn relay (the third in) needs the purple loop removing.


Loop to remove can be seen here if you look carefully!
Loop removed

Earth added (see arrow)
Washer

The washer needs the green (or light green in my case) removing and replacing with an earth.
Earth wire (black) replaced green wire
Intermittent wiper

Then its the intermittent wiper. This needs more wires changing and a relay adding (VW 3BO955531 or 357955531). This has been ordered. It was easy enough to wire, although I did not have the correct colour wires, so used the correct gauge wire that I had and marked it up with the correct colour and the relay terminal. Refer to the GD diagram for wiring.
Changes made to wiring on column switch
Other connections

Now the bits that I hadn't done earlier!

The brake fluid warning wires on the loom had not been fed through the bulkhead or connected, so that was done.
brake fluid warning wires finally connected
Then it was pushing the fuel pump wire through the grommet at the top of the passenger foot well. Some Vaseline helped here. A new terminal has been ordered.

So hopefully that is the end of the wiring, assuming it all works! Now it is down to testing all the electrics.

Passenger seat

This was really easy compared to the driver's side. Basically I used the same process as on the drivers side, but did not have to worry about the handbrake. The seat belts were also added. Another job done.

Wednesday, January 04, 2017

Foot well carpet and bits

Number plate lamp

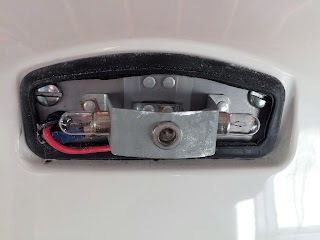
Sorted the number plate light today. The bolt was not holding the chrome trim properly. I drilled out the supposedly threaded hole and fixed a rivnut. This sorted it out.
Rear number plate light fitting with rivnut

Fog light wiring

For some reason I had not connected the three wires to the loom. Straight forward.

Foot well carpet securing tags

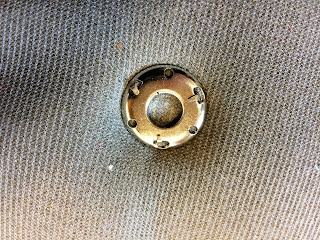
These tags are to stop the carpet moving. This is especially important on the driver's side. The fittings are made up of a press stud for the floor and two rings for the carpet.
The three parts to each fitting
One of the rings had three prongs (upper), the other has holes for the prongs to go through (under carpet). First I fixed the press stud parts to the floor using self tappers. I made sure that the studs were under the carpet and not the rubber heel pad.
Press stud on floor
Chalk was applied to the top of the press studs and transferred to the back of the carpet. The ring with the holes was placed on the underside of the carpet, over the chalk mark of the press stud. The ring with the prongs on the top side was lined up with the holes and the three prongs pushed through the carpet. The prongs were then tapped over the lower ring, trapping the carpet.
Ring on underside of carpet
Top pronged ring can be seen here - rubbing the carpet makes the ring almost disappear
So the foot well carpets are now fixed down with the press studs.
Passenger foot well carpet fixed
Door card

I had never been happy with the passenger door card fitting. So I took the opportunity to refit it in the right location. It was only a few millimeters out, but I could see it.

Sunday, January 01, 2017

Seat fixing - fitting to the car

Fixing the seats

This turned out to be a real pain and very time consuming - working out where to drill the holes to fix the runners. In the end I may end up changing the head restraints (which are currently mounted on the seat) to ones mounted on the roll over bars. Otherwise the head restraints touch the rear bodywork, the seat belts touch the head restraint and the head restraint restricts rearward seat movement - apart from that lot it is fine!

GD had supplied four fixing bolts, washers and spacers for each seat.  The long bolts and spacers go at the front of each seat. All the spacers were sprayed satin black to blend in (not that you can see them) and to reduce the risk of corrosion.

The carpets under the seats were turned back. Here I had to remove the seatbelt anchorages from the floor. A measurement from the rear bulkhead of 560 mm was used to locate the front fixing points on my seats, but check your own as Keith Akerman used 640 mm. The front hole nearest the transmission tunnel was about 75 mm from the tunnel side and about 90 mm away at the rear mounting point. A template of the bolt holes was used to determine the other location points.
Template taken from bottom of seat, marking the bolt holes
8 mm holes were drilled through the floor to take the fixing bolts. The holes I drilled in error (I had the runners in the wrong position), will act as drain holes!

The bolts were put loosely in the runners, before the seats were positioned in the car.
Bolts loosely fitted to runners
The seats were then trial fitted, before holes were cut in the carpet. Getting all four bolts through is not easy, so the rear holes were slightly larger.

The carpets were re-fitted with the seatbelt eye bolts. The holes in the floor were then marked with chalk and the carpet placed over them. The chalk was transferred on to the back of the carpet by pressing it with my fingers, before holes were cut in the carpet. Finally the seats were put in to the car and with the spacers at the front. The length of each bolt was noted, the seat removed and each bolt shortened to the appropriate length. The seats were fixed in place using the bolts, nylocs and penny washers from underneath the car.
Driver's seat fitted
Now just the passenger side to do.

Handbrake

Once the seat was in place, I could hardly get my fingers around the handbrake. I solved this by fitting a 3 mm spacer at the front handbrake mounting. Because the rear had no spacer, this caused the front of the handbrake to be move away from the car side and this created enough room to use it. Useful!!

Spacer between the handbrake and front mounting can be seen
The leather that covers the handbrake and the escutcheon were re-fitted.

Attaching the seat belts

I am fitting four point harnesses. I have had these in my Caterham and five point in my other two race cars. The five point were great in the race cars and stopped me submarining under heavy braking, but they could hurt the gentleman parts at times! So four point it was. You feel so secure with them on and they stop you moving about in the seat.

The harnesses are the clip in type in black to match the leather trim. It was simply a case of attaching them to the eye bolts on the fixings on the roll hoops and to the anchorages that I had located on the floor. The belts were then adjusted to suit me. At this point I took the opportunity to shorten one of the eye bolts so that it did not protrude from the fixing under the car.
4 point belts fixed
To keep the IVA inspector happy, I will edge the belt fixings with rubber trim to make sure that the curves are of sufficient radius.